In my last article, Rough-Ins and Connection Points: Foodservice Engineering 101, I mentioned how particular foodservice designers can be and this is never more present than when it comes to their schedules. Each design firm has their own standards that include which columns show up in their schedules and how to fill the fields in each row.
Unfortunately, Revit does not make this easy. Quite the opposite actually, Revit schedules are notoriously difficult to use, especially when a foodservice designer is trying to apply the standards they have used for years. Simple things like overriding a Quantity field or just typing in a "/" to show "120/208" are not possible without using workarounds and mental gymnastics and this article is going to include quite a few.
At our inaugural weekly KitchDesigner/Revit Q&A webinar this past Wednesday, I received a simple question, or at least it seemed simple.
"How do you show "LOT" in the Quantity column for equipment like shelving or trash cans?"
I said, "That's easy, we can just use calculated parameters", and proceeded to walk-through how it is done during the webinar.
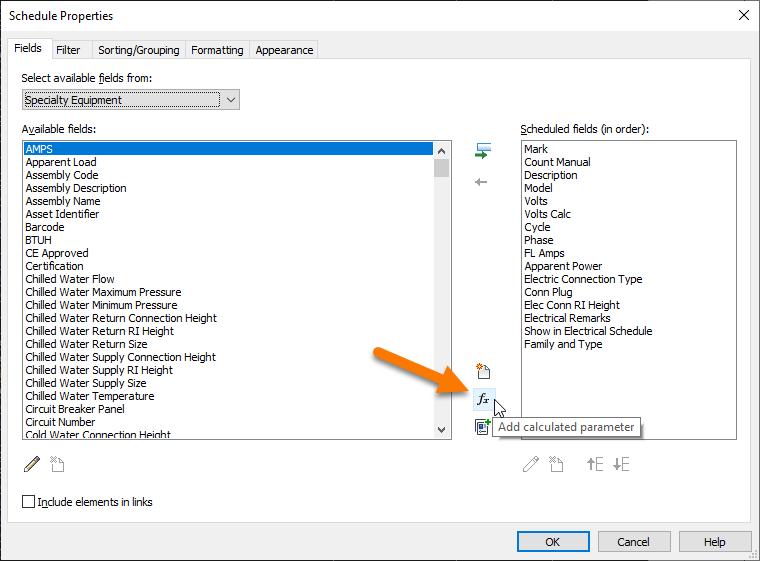
I went to create a new Calculated Parameter that would use Revit's built-in Quantity parameter called Count that automatically calculates the total number of each type of equipment. I immediately hit a brick wall, Revit gave an error message that doesn't allow the usage of the Count parameter in Calculated Parameters or any formula for that matter.
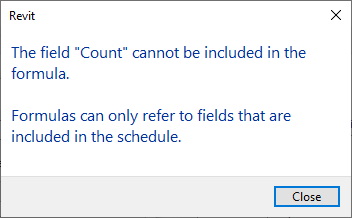
I had to backtrack and eventually told my webinar guests that I would have to get back to them. I wasn't very optimistic that I was going to find a solution either, without being able to use the Count parameter in a formula there didn't seem to be a path ahead.
Creating a Count-like parameter that can be used in Revit Formulas
So I went to the place I always go to when I have no idea what to do, Google. Lucky for me, this problem is not isolated and there were several other posts about this exact topic. It only took a few Revit forum posts before I stumbled upon the solution.
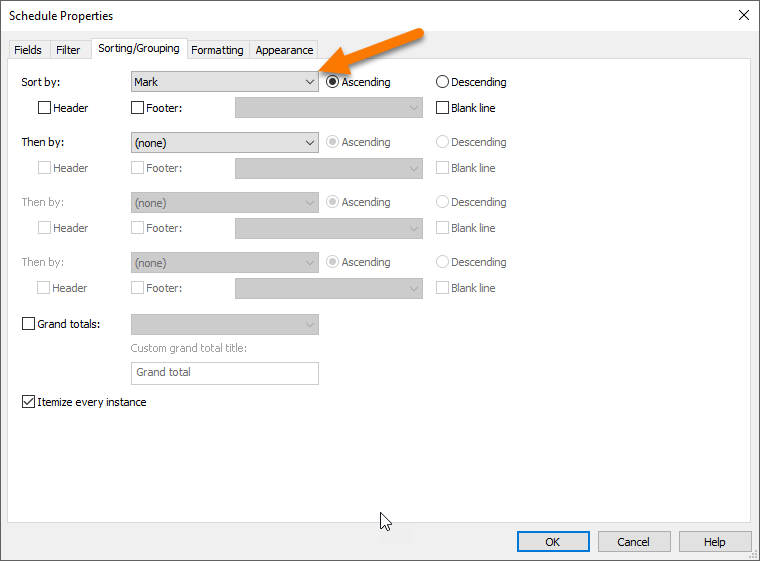
But first you need to make sure your schedule is sorting by the Mark parameter.
Next all we need to do is create a new Calculated Parameter with an Integer data type and in the Formula field type the number 1. I named my new parameter "Count Manual".
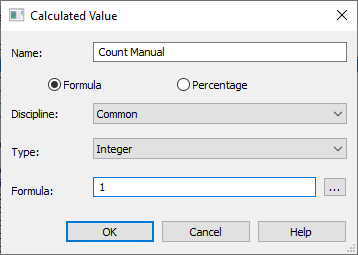
I was immediately relieved, the Count Manual parameter worked identical to the Count parameter but the Count Manual parameter could be used in formulas. As we learned in the Foodservice Schedules in Revit using Calculated Parameters article, it is possible to use a formula in a Calculated Parameter to pass the value of an Integer data type parameter to a Text data type parameter. This is important because Revit doesn't allow one parameter to have more than one data type and that is exactly what we are trying to do here. Count Manual is an Integer parameter and the new Quantity parameter we are going to create will have to be a Text data type for us to show "LOT" for the shelving in our Quantity column. The path forward looked promising and my optimism returned, at least temporarily.
Passing the value of an Integer data type parameter to a Text data type parameter
So now back to the Schedule Properties to create another Calculated Parameter. The goal would be simple, to create a Text data type parameter that would look identical to the Count Manual parameter we created. I named this parameter "Quantity", set it to the Text data type, and began typing in the Formula.
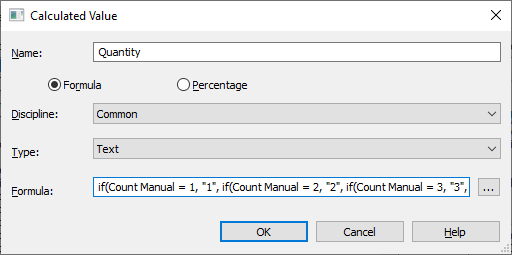
Revit formulas are similar to Excel formulas but with much less functionality. I learned about Revit formulas from this forum post, Revit formulas for "everyday" usage, and still refer back to it to this day. For this particular formula, we are going to use the IF conditional statement.
It goes like this: IF (<condition>, <result-if-true>, <result-if-false>)
The condition is the test and the results are what will show up in our schedule. Since our Quantity parameter is a Text data type, we need to make sure that both the <result-if-true> and the <result-if-false> both return Text values. We can force the Text data type to be used by placing our results in quotations, so by typing the number 1 as "1" will result in 1 as Text. The last trick is to place an additional IF statement in the <result-if-false>, thus allowing us to extend the Formula to contain to several IF statements.
Here is the formula I used to start with:
if(Count Manual = 1, "1", if(Count Manual = 2, "2", if(Count Manual = 3, "3", "MAX")))
Our <condition> is Count Manual = 1
The <result-if-true> is "1", the <result-if-false> is our next IF statement.
I planned on repeating this pattern up to 30 to cover the maximum Quantity I would expect to see in a foodservice schedule, but you could go as higher if you want. At the end you will need to provide a Text value in the event the Quantity is above your high limit. I chose "MAX". I clicked OK and didn't receive an error message, this was actually going to work I thought.

At first glance it looked great. But I had "Itemize Every Instance" checked in the Schedule Properties(shown above), and when I unchecked "Itemize Every Instance" is when it all fell apart(shown below).

Revit was not passing the total of the Count Manual parameter to the Quantity parameter, it was only passing "1". Oh no, I quickly went from optimistic to hopeless. So close but yet so far away. My only hope was to find another workaround so back to Google I went.
Using a Calculated Parameter with Percentage to find the Count Manual totals
At this point you are probably wondering how much farther down this rabbit hole do we have to go, that's what I was thinking to. But then after an hour of searching I found something brilliant, a forum post that talked about how to use Calculated Parameters and the Percentage option to calculate the total Count.
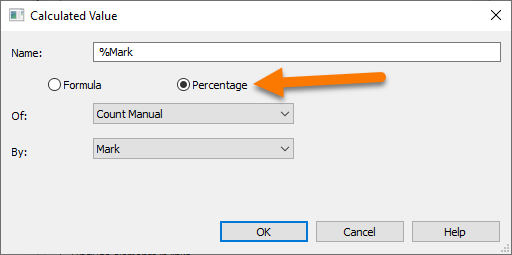
So I created another Calculated Parameter called "%Mark", set it to Percentage, and selected Count Manual and Mark. Here is the logic behind this one: Using Calculated Parameters and the Percentage option, we are able to calculate the percentage of each family by its Mark value.
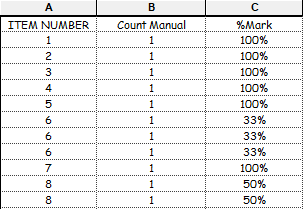
So if there are (3) Item # 6's in our project, each of the Item # 6's would receive a percentage of 33%. Each Item # 6 is 33% of the total # of Item # 6's.
Using this percentage we are able to calculate the total by dividing 1 by the percentage.
1 / %Mark = Total Count
1 / 33% = 3
All we need to do now is go back to our Quantity parameter and change our Formula to use 1 / %Mark instead of Count Manual. I also changed the name of Quantity parameter to Quantity Text since we have one more step to get "LOT" to show up.
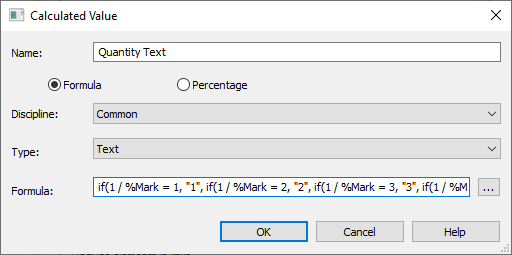
After successful testing I also added the full formula shown here:
if(1 / %Mark = 1, "1", if(1 / %Mark = 2, "2", if(1 / %Mark = 3, "3", if(1 / %Mark = 4, "4", if(1 / %Mark = 5, "5", if(1 / %Mark = 6, "6", if(1 / %Mark = 7, "7", if(1 / %Mark = 8, "8", if(1 / %Mark = 9, "9", if(1 / %Mark = 10, "10", if(1 / %Mark = 11, "11", if(1 / %Mark = 12, "12", if(1 / %Mark = 13, "13", if(1 / %Mark = 14, "14", if(1 / %Mark = 15, "15", if(1 / %Mark = 16, "16", if(1 / %Mark = 17, "17", if(1 / %Mark = 18, "18", if(1 / %Mark = 19, "19", if(1 / %Mark = 20, "20", if(1 / %Mark = 21, "21", if(1 / %Mark = 22, "22", if(1 / %Mark = 23, "23", if(1 / %Mark = 24, "24", if(1 / %Mark = 25, "25", if(1 / %Mark = 26, "26", if(1 / %Mark = 27, "27", if(1 / %Mark = 28, "28", if(1 / %Mark = 29, "29", if(1 / %Mark = 30, "30", "MAX"))))))))))))))))))))))))))))))
And here is what our schedule looks like with Itemize Every Instance On:
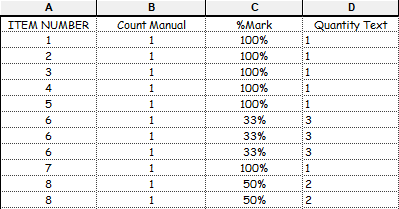
And with Itemize Every Instance turned Off:
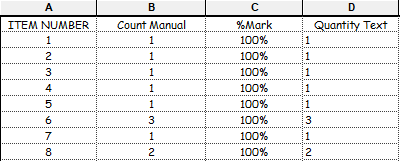
Now all we need to do is add a way to override the Quantity Text parameter with "LOT".
Override Quantity with "LOT" using a Yes/No Checkbox Parameter
I decided to use a Yes/No checkbox to control when the Quantity parameter displays LOT as opposed to the actual total quantity. To do this I just created a Project Parameter from the Schedule Properties called LOT and set the Type to Yes/No. You could also use a Shared Parameter which would allow you to pre-populate the LOT value inside some of your families.
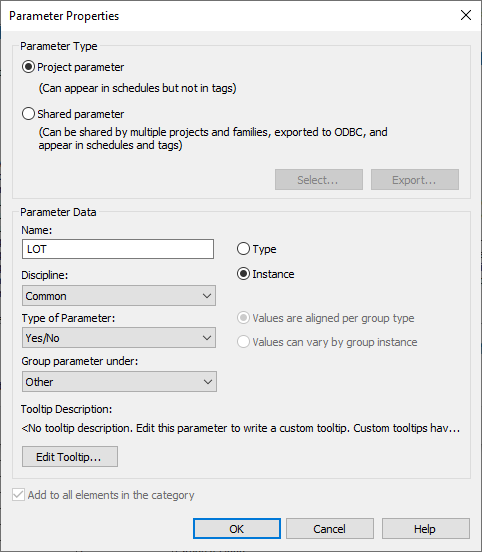
Now all we need to do is create one last Calculated Parameter which will be used to determine whether "LOT" is displayed or whether the total quantity is displayed.
This time I will name our parameter "Quantity", change the Type to Text, and add the formula that will determine whether "LOT" is displayed or whether the value of the Quantity Text parameter is displayed.
The formula is actually quite simple, our <condition> is whether LOT is checked. If yes, display "LOT", if no display the value of Quantity Text parameter.
if(LOT, "LOT", Quantity Text)
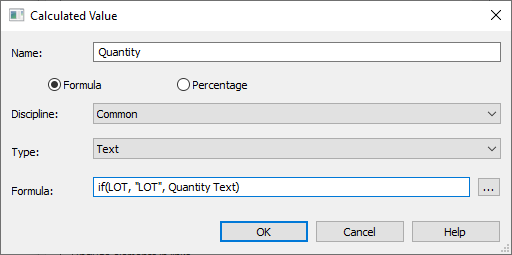
(4) Calculated Parameters and a Project Parameter later and this is what our schedule looks like:

And when we hide the columns that we will never use, we get this:

And that is how you create your own auto-totaling Quantity parameter with a LOT override. I hope you enjoyed the ride. The good news is that this is just a one time setup kind of thing, once you have it set up you won't need to do it again.
All of this sparked from a simple question during our weekly KitchDesigner and Revit Q&A, which runs every Wednesday at 2pm EST.
To check out our full webinar schedule and join us for an upcoming session, click below.


