

Tutorial 0.5 - Mouse in the House
Alright here we go. Before we begin, I want to make sure you have a much-needed piece of hardware. You must have a mouse with a mouse wheel (and a mouse wheel button that works), and if you don't know what a mouse button is, basically your mouse wheel should be able to be clicked. The mouse wheel button makes Revit work.
1) Spin the mouse wheel to zoom in and out in a Revit view.
2) Press the mouse wheel button and drag it to pan, a.k.a., drag the view or move around the view.
3) When in a 3D view, hold SHIFT and press the mouse wheel button then drag it (pan) to rotate.
These three mouse wheel-related maneuvers will be second-nature in no time.
If you want a tip on purchasing a new mouse, get one that allows you to change the DPI with the click of a button, that changes the speed at which the mouse cursor moves and can be very helpful.
Tutorial 1 - Create an Equipment Schedule
 So first things first, go install any version of Revit. This blog will not be version specific although I am using Revit 2017, but it will not matter which version you select.
Once the installation finishes open Revit.
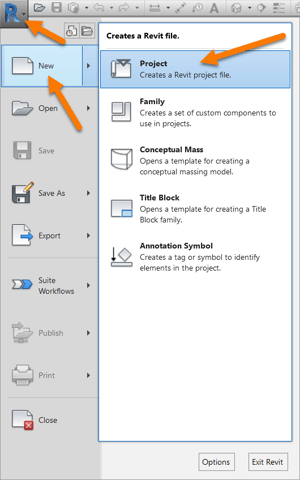
Next click the R in the upper left hand corner, then click New, then click Project.
The R is the Revit main menu.

A New Project window will appear, change to Project template with <None> template file selected.
Select Imperial to set the Units.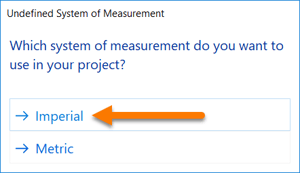
Okay next up is the dreaded blank white screen. Many of foodservice designers have shipwrecked here before.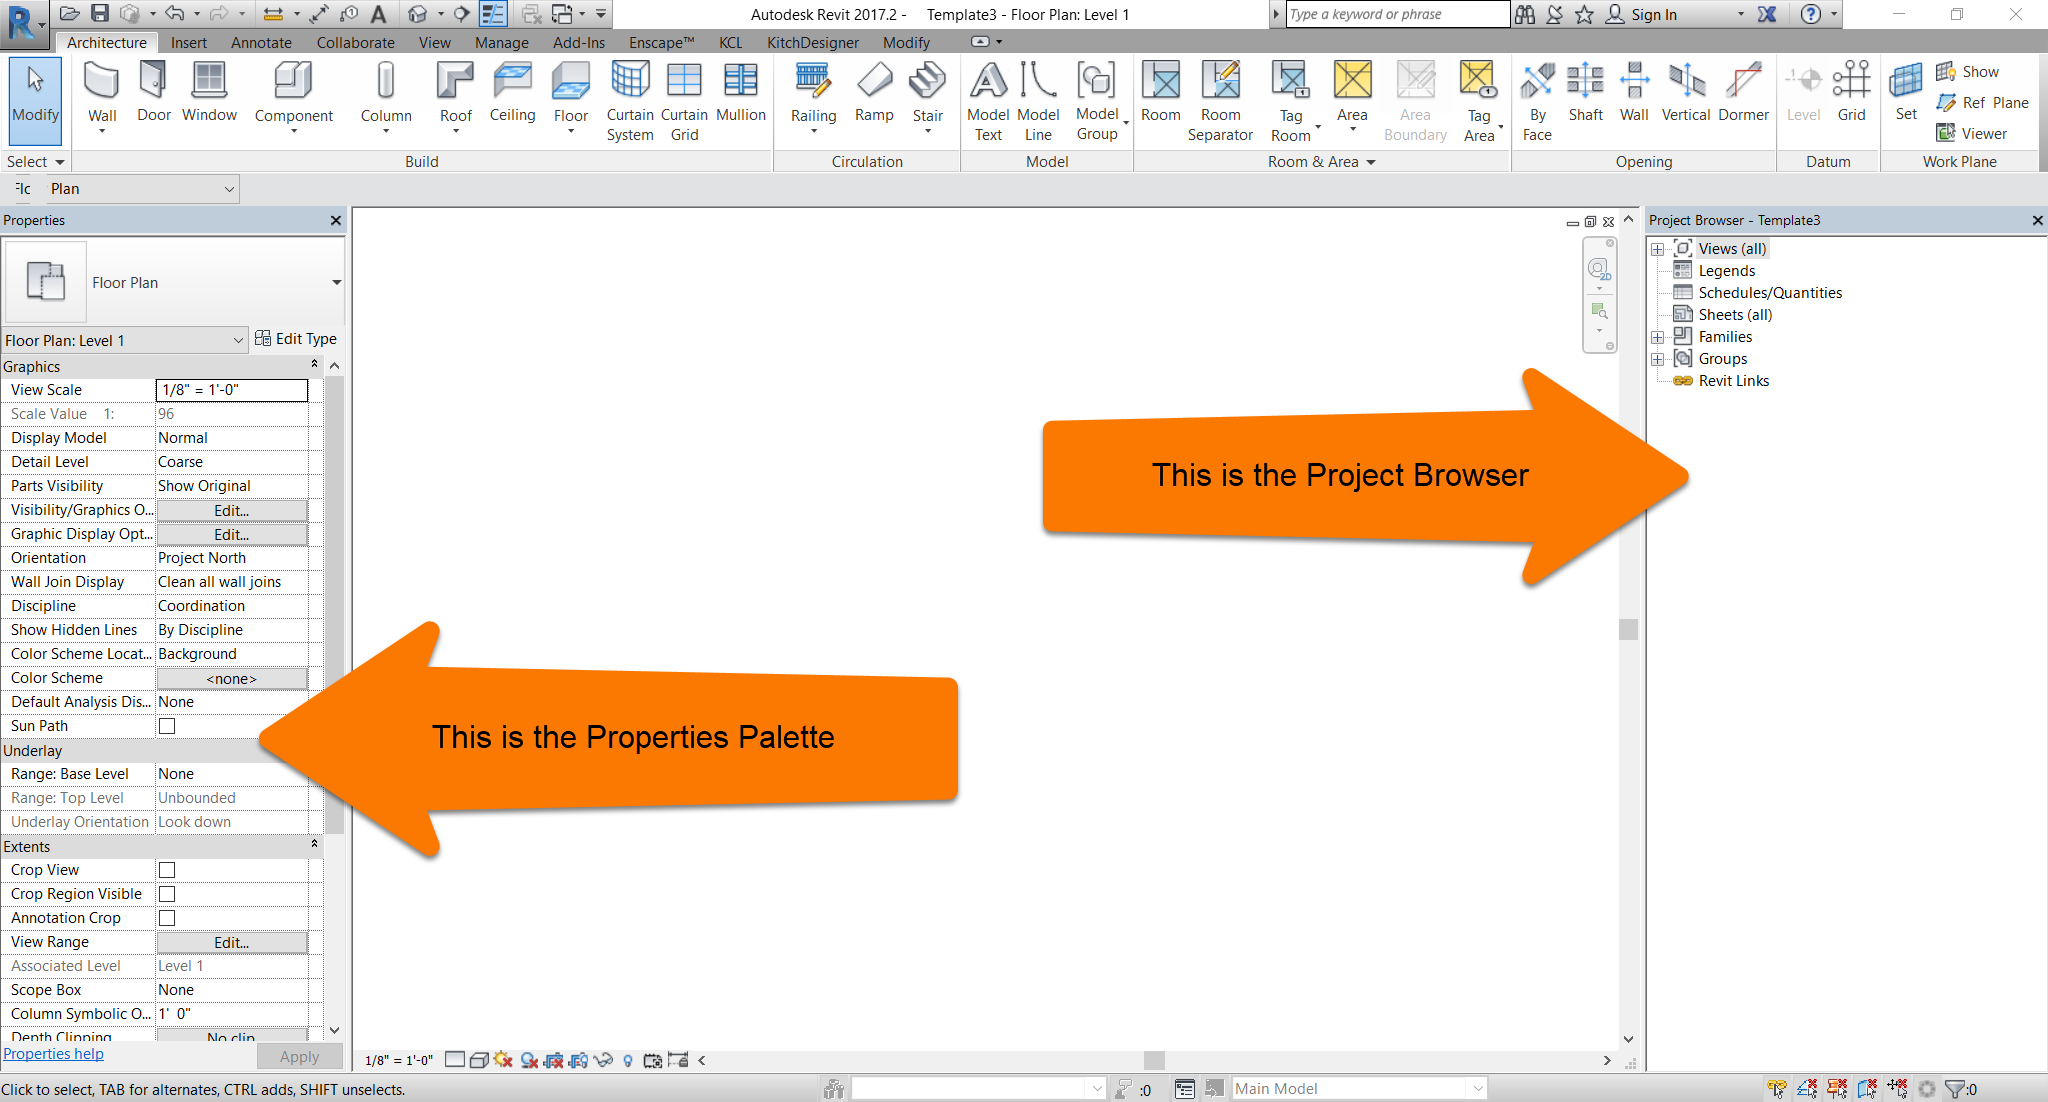
The first thing we are going to do is get acquainted with this screen.
The Properties Palette is your manipulator. You can change all types of settings and parameters from this window. First you must select the element if you want to view or change the properties. When we get to families, this same Properties window will display the parameters of the family such as length, width, height, Mark or Item Number, and many more.
The Project Browser is your navigator. Double-clicking any of the elements will open up a new window. This is how you navigate from your floor plans to elevations to 3D views to schedules to legends and so forth. You can create new Sheets, new Legends, and new Schedules by right-clicked the different sections and selecting a New item.
Let’s start by creating our Equipment Schedule. You can create a New Schedule directly from the Project Browser by right-clicking the Schedules/Quantities...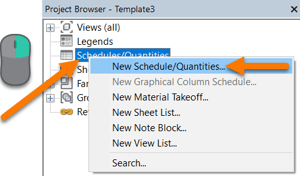
Let's do that now.
Right-click Schedules/Quantities
Then select New Schedule/Quantities...
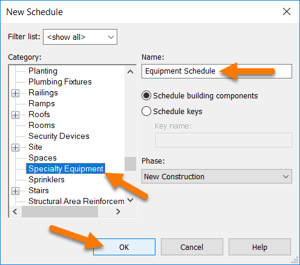 In the New Schedule window, change the Category to Specialty Equipment
Also change the name to Equipment Schedule.
It is also possible to change the name from the Project Browser if you need to rename a schedule later.
Then Press OK.
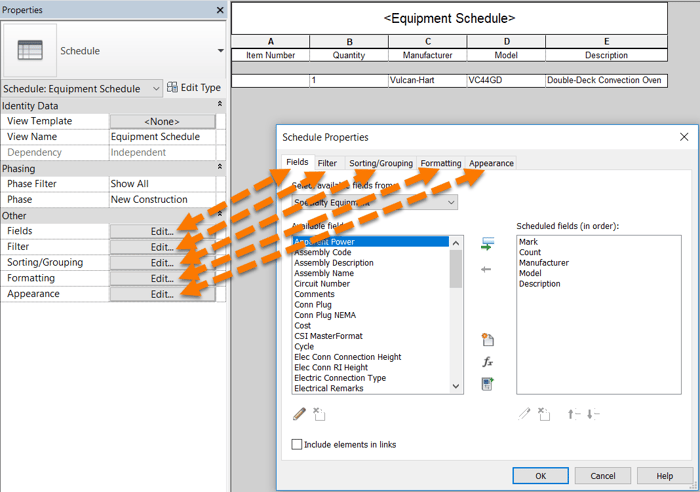
Ok so now we are at the Schedule Properties window. Here Revit wants us to select the fields we want in our schedule. Fields are another name for the column headers in a schedule, and they are also parameters. Parameters are attributes specific to each element and can be displayed in the Properties Palette. For example Item Number, Manufacturer, Model, Description, etc.
For our equipment schedule we want to schedule the following fields: Item Number, Quantity, Manufacturer, Model, and Description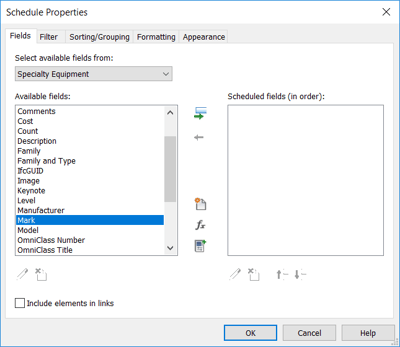
The problem is we don't have all of those choices. I see Manufacturer, Model and Description but not Item Number or Quantity.
That is because Item Number is not a Revit standard parameter. Instead they have Mark which is very similar and can be used in the meantime.
Quantity isn’t a Revit standard parameter either. Instead Revit has something called Count. Count cannot be changed manually by typing it in, it only works by how many instances of the Family are in the model. This is a key concept is Revit that we will be discussing again and we will be using the Count parameter.
Highlight the parameter you want to move to the right and click the green arrow.
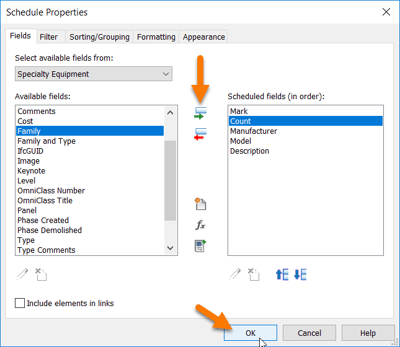
Press OK when your Schedule Properties look like the one above.
Check it out, not bad for just starting. We have an Equipment Schedule, well kind of.
As you can see we have a schedule…just an empty schedule. Let’s change that by adding a Specialty Equipment family.
First let's close our Equipment Schedule, this will return us to our Floor Plan: Level 1 view.
The blank white screen that we landed on when we started our Project Template was actually the default view that comes with all new projects. It is a Floor Plan view named Level 1.
Let's find the Level 1 view in our Project Browser.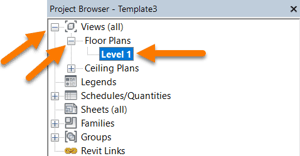
First expand the + next to Views(all)
Next expand the + next to Floor Plans
Here you will find the Level 1 Floor Plan view.
So let’s insert a Family into the project. I will use a Vulcan convection oven Revit family, here is a link to download it. Vulcan VC44GD Convection Oven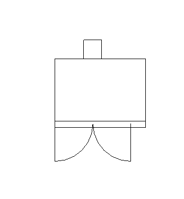
Now is probably a good time to go over all the different ways you can insert families into Revit.
First up, a simple drag and drop from Windows explorer or Dropbox or any file folder.
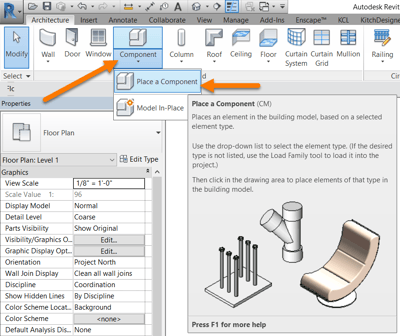
Next, you can use the Place Component button on the Architecture ribbon.
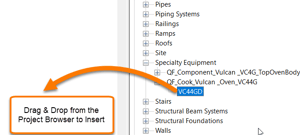
You can even drag and drop a family from the Project Browser if the family has already been inserted before. In the Project Browser, Expand Families then expand Specialty Equipment to find the equipment families you inserted.
And finally, if you are using KCL, it also has a button to insert directly into Revit. I prefer this method.
The method you choose to insert usually depends on where you are getting the family from but ultimately they all achieve the same result.
Once you insert your family into Revit and place it on your Level 1 floor plan view, let's go check our Equipment Schedule.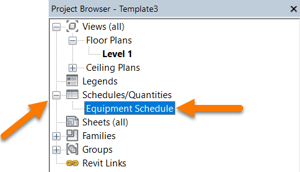
Expand the + next to Schedules/Quantities and you will find the Equipment Schedule.
Double-click the Equipment Schedule to open it.
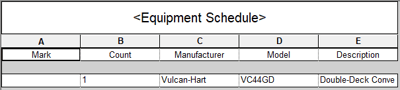
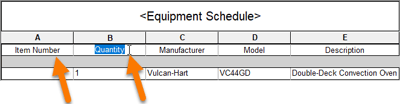
Not bad for the first one. Let’s click on Mark and Count headers to rename them to Item Number and Quantity.

Getting better, but we can do better. That blank gray line separator doesn’t seem necessary and the numbers look a little odd when left-aligned, let’s go back into the Schedule Properties to make these changes.
But first I want to show how the Schedule Properties connect to the Properties Palette.
This is the same Schedule Properties window that we used earlier to select our Schedule fields, it has five different tabs. We used the Fields tab earlier, next we will use the Formatting and Appearance tabs. These five tabs can also accessed by clicking on the five Edit buttons shown in the Properties Palette when editing a schedule (schedule is active).
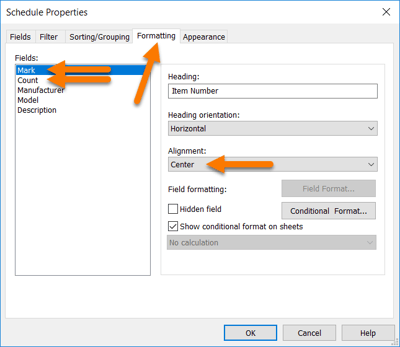 Ok lets start by going to the Formatting tab to change the alignment.
Select the Mark field and change the Alignment to Center
Also select the Count field and change the Alignment to Center
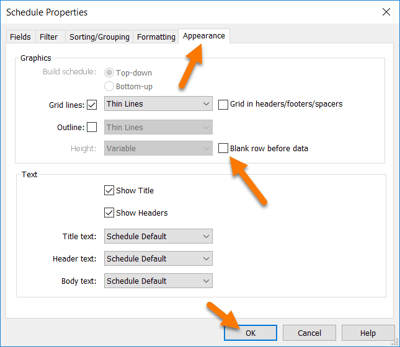
Next pop over to the Appearance tab.
Here is where we can remove the blank row after the headers.
Click to uncheck the Blank row before data box.
Then click OK and go back to the Equipment Schedule.
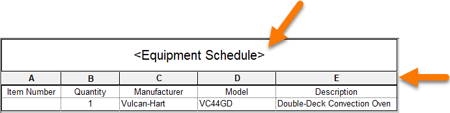
Looking much better.
Don’t worry about the row of A, B, C, D, E – that does not show up on the sheets. It is just for quickly selecting the entire column similar to Excel. Also don’t worry about the < and > around the title, those wont show up when printing either.
Don’t take my word for it though, lets close out this blog post by creating a blank sheet to place our schedule on so we know what it will look like when it is printed.
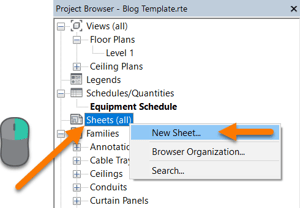
Right-click Sheets(all) in the Project Browser
Then click New Sheet...
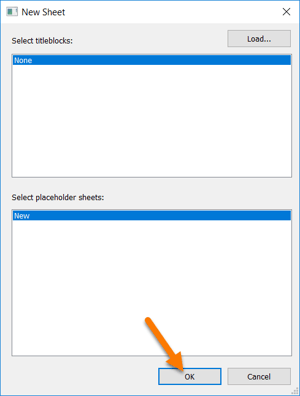
A New Sheet window will appear and you can just click OK.
Later when we create a titleblock this is where you would select the title block for the sheet. But we don't have a title block yet so for this tutorial just click OK to create a blank sheet.
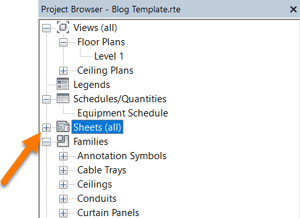
If you are having any trouble finding the new sheet you just created, click on the + to expand Sheets(all)
 There it is.
Notice that it doesn’t ask you for the Sheet Number or the Sheet Name, but it does create them for you.
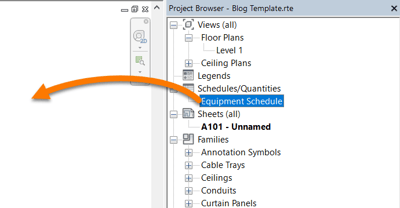
One tip for identifying the active view in Revit it by looking at the Project Browser, if something is bold then it is the active window.
With your Sheet active, drag and drop your Equipment Schedule onto the blank Sheet.
 After inserting the Equipment Schedule onto the Sheet, it shows up as this tiny blue group of triangles. Hmm that doesn't look correct.
But that is indeed your Equipment Schedule, you just need to zoom in. I also needed to stretch my columns back out.
Those blue triangles are just the column adjustments. Zoom in to find this.

Click on any of the white space and voila, you have your very own Equipment Schedule.

Thank you for attending the Kitchautomation Academy!
Next up- Create a Floor and a 3D view
Cheers!