

Click Here to Download the Tutorial 10 Revit Template to use with this tutorial 👈⏩💾.
Tutorial 10 - Create MEP Schedules
Well we are finally to the MEP part of the journey and first up is the MEP schedules.
Before we create our MEP schedules, we are going to create a schedule template known as a master schedule. We will then use our master schedule to create the electrical, plumbing, mechanical, and ventilation schedules. Once you have a master schedule, creating new schedules is a breeze. I will also give you a special family that will speed up the process. But first let's learn the how and why.
To create these schedules, we are going to need to use some more shared parameters, but this time we don’t want to create our own shared parameters, we want to use the industry standard parameters. Let me explain why we need to use shared parameters first, then I will explain why we want to use the Industry Standard Parameters instead of creating our own.
Let’s go back to the last time we created shared parameters, the submittal parameters for our title block family. Do you remember why we had to create shared parameters for that?
We had to use to shared parameters because that allowed us to create multiple title block families for each of the different sheet sizes and use those title blocks interchangeably, basically we could swap one size for another at any point in the project and any of the Submittal data that we have created would migrate over to the new title block.
The only way to create an identical Submittal 1 Name parameter in the 24”x36” title block and in the 30”x42” title block is by using shared parameters. If we tried to create a parameter named Submittal 1 Name in both of those title block families, the parameter would never automatically move from one title block to the other and you would have to type in the same submittal every time. This means we would not be able to use the title blocks interchangeably, instead if we started the project in 30” x 42” and the architect decided to change to 24” x 36” then we would have to manually type in all of the Submittal data into the new title block, none of that data would just migrate over. Not too big of a deal, right? It gets worse.
Since we create schedules based off parameters, you would also not be able to use the same submittal schedule for all your title block sizes and instead you would have to use a different schedule for each size. And that is why we must use shared parameters for the submittal parameters.
Now let's think of this in context.
Instead of having different sheet sizes, you have every foodservice project.
Instead of submittal parameters, you have MEP parameters for every piece of equipment in every project.
If we didn't use shared parameters, we would need to type in our MEP data for every piece of equipment in every project we design. Shared parameters are a must.
Shared parameters are parameter definitions that can be used to create shared project parameters or shared family parameters. Shared parameters can be used as project parameters to create MEP schedules and then those same parameters can be used in equipment families as shared family parameters. The data in the equipment families shows up in the MEP schedules since they are the same shared parameters from the same parameter definitions. This is one of the hardest concepts to grasp in Revit, take your time with it.
So that answers the first half, now why should we use the Industry Standard Parameters?
You just learned that you can create a MEP schedule in your project and every family that you insert into that project from KCL or from your hard drive will automatically show up in your MEP schedule, but only if the families are using the same shared parameters as the project.
So, it’s quite simple, if you don’t use the same shared parameters that all the industry is using to create the families in the first place, then you are missing out on all that important MEP data!
FCSI, the Foodservice Consultants Society International, created an industry standard shared parameter list with the help of several of the best foodservice consultants in our industry and they updated the standard in 2015. In the link below you can download the "FCSI shared parameters list.txt" which is a Revit Shared Parameters file.
I encourage you to also check out the 2015 Revit standards that FCSI provides while you are there.
The Kitchautomation software also uses the FCSI shared parameters for many of its tools since we are required to use the industry standards to take advantage of the MEP data, just like you.
We keep referring to the FCSI shared parameters as the Industry Standard Parameters because that is really what they are. We also want everybody in the industry to understand they are there for them, they are not some special parameters for FCSI members.
Now that you know the “how” and “why” of shared parameters and MEP schedules, let’s put our knowledge to work and create our Master Schedule.
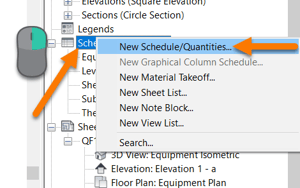
First up, let's create a New Schedule.
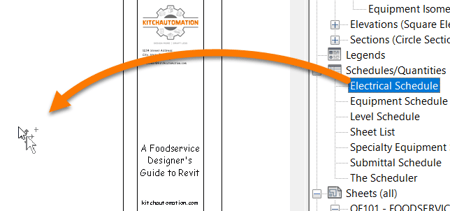
 Right-click the Schedule in the Project Browser and click New Schedule…
In the New Schedule window, select the Specialty Equipment category.
Then change the name to Master Schedule.
Then click OK
Why are we selecting Specialty Equipment for the Full MEP Schedule, shouldn’t we be picking a MEP category like Electrical Fixtures?
No, if we picked Electrical Fixtures then our schedule would only show Electrical Fixture families and we don’t have any of those yet 😉. We want our schedule to show our equipment, and our equipment is Specialty Equipment. Remember when you are selecting the Category of your Schedule that what you selecting is which families you want to appear in the rows of your schedule.
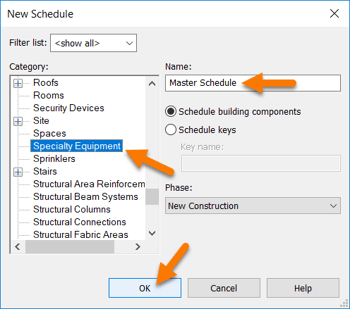
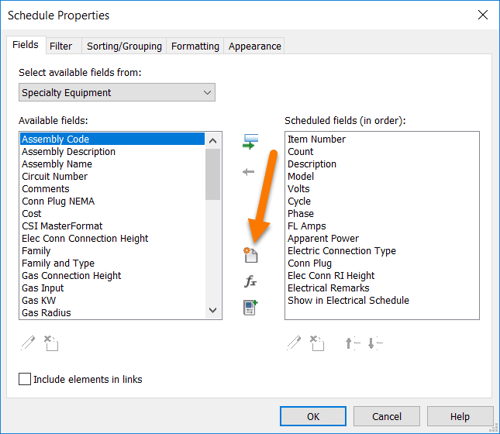
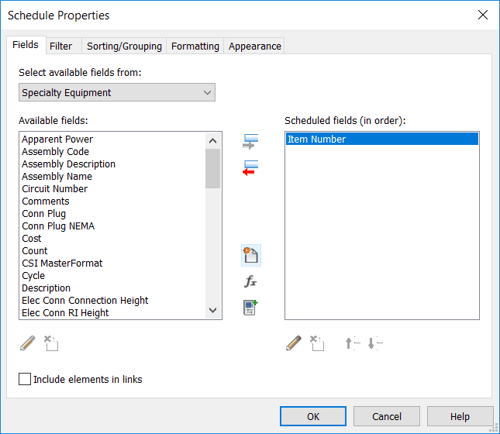
 After you click OK, a Schedule Properties window will appear.
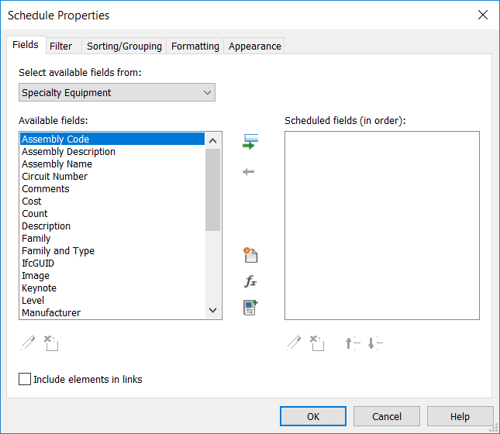
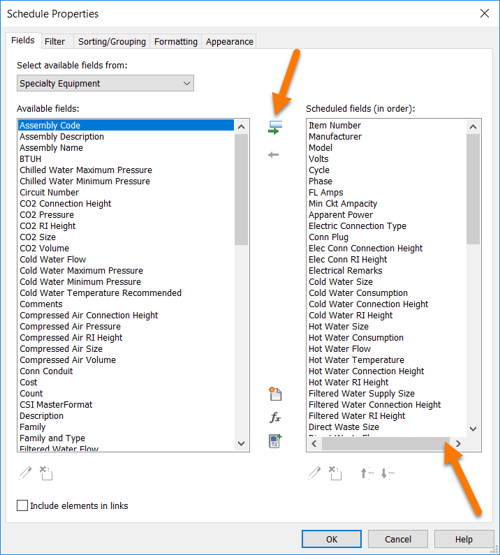
The Available fields in your Schedule Properties window may look exactly like the window to right.
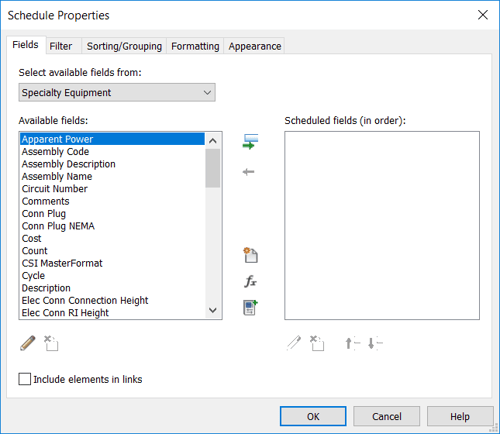 Or they may look like this window
Hmmm...
After studying the (2) it’s clear that one of them has a bunch of parameters that the other does not. More specifically, it has a bunch of parameters that relate to foodservice, Elec Conn RI Height, Item Number, Volts, Gas Size, just to name a few.
If you inserted the same Vulcan convection oven family that we inserted back in the first tutorial, then your Schedule Properties should include these additional foodservice parameters.
If you did not insert the Vulcan family, or any other foodservice family, then your Schedule Properties will look like the top version without the extra parameters.
When you insert a family into your project, any shared parameters the family contains will become available fields in your Schedule Properties.
Our Vulcan family contained Apparent Power, Conn Plug, Conn Plug NEMA, Cycle, Elec Conn Connection Height, Elec Conn RI Height among others. After we insert that Vulcan family into our project these parameters become available fields. These parameters also happen to be Industry Standard parameters as you may have guessed so having these parameters as available fields makes our job easier.
Wonderful, we just figured out one way to add available fields.
But what if you didn’t have the family inserted?
 To add an available field, we need to add a parameter.
Let’s do that now.
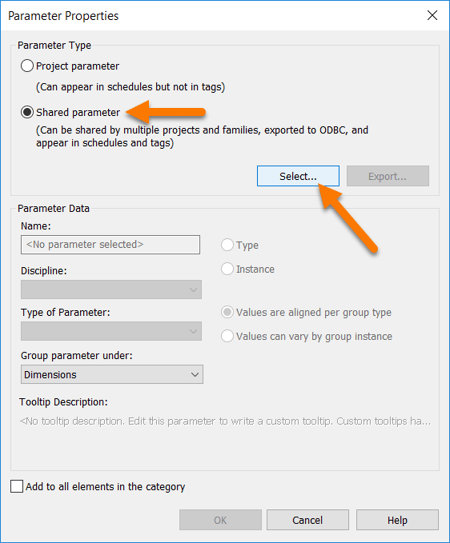
To create a new parameter, click the New parameter button.
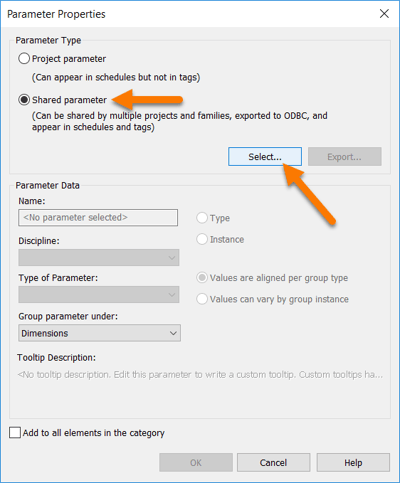 The Parameter Properties window will appear.
Select Shared Parameter and then click Select…
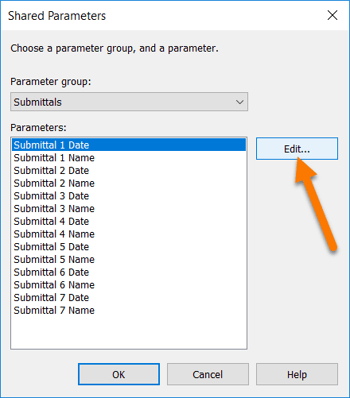 The Shared Parameters window that pops up will show the shared parameters that were last used.
For us that is the Submittal parameters.
It may seem like the Edit… button just allows you to make changes to the Submittal 1 Date parameter that is highlighted, but that is just bad design by Revit.
It actually allows you to do much more.
Let’s click Edit…
Alright now we are getting somewhere.
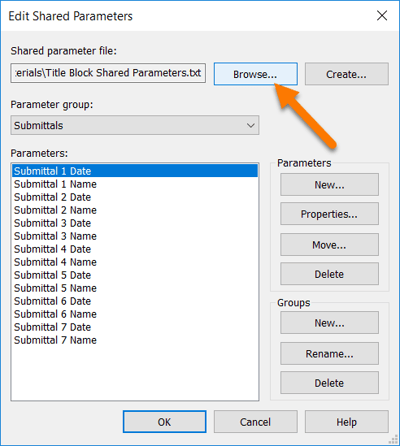
As you can see, the Shared parameter file that is currently loaded is the Title Block Shared Parameters.txt file that we created for our title block.
You can switch the Shared parameter file at any time by using this method.
Click on the Browse… button.
Then select the FCSI_Shared_Parameters_List.txt file and select Open
Again, here is a link if you need to download that file.
Download FCSI_Shared_Parameters_List.pdf
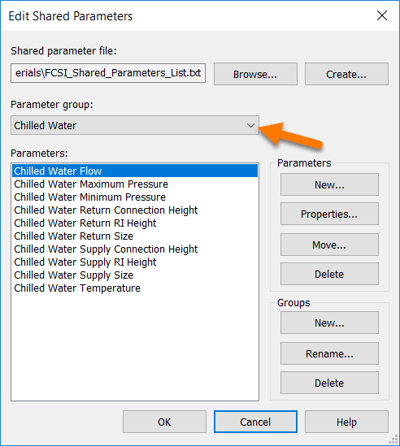 Now when you return to the Edit Shared Parameters window you will be greeted with Chilled Water parameters.
Let’s see what else is here.
Click on the Parameter group dropdown to see the other groups.
 Now isn’t this grand.
Feel free to bounce around and check out what parameters are included and don’t be intimidated by the sheer amount of them, we will only be using a fraction of them.
The Industry Standard Parameters were designed to be inclusive of all foodservice designers so some parameters may seem obsolete but they may also be required on a special project for the federal government or for a European project being designed in the United States.
It isn't possible to load the entire list of shared parameters into your project, Revit intended for you to grab only what you need to not over complicate your model.
 Personally, I think they also provide a great roadmap on how to build your schedules, all you need to do is pick out the parameters you want to use for your schedules from this awesome list.
So let’s jump in and you will see what I mean.
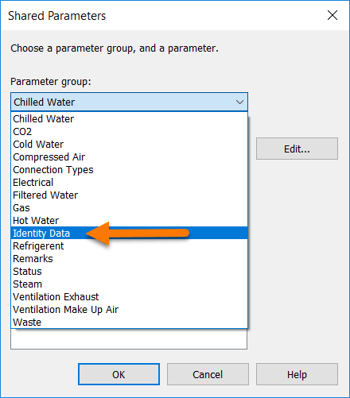
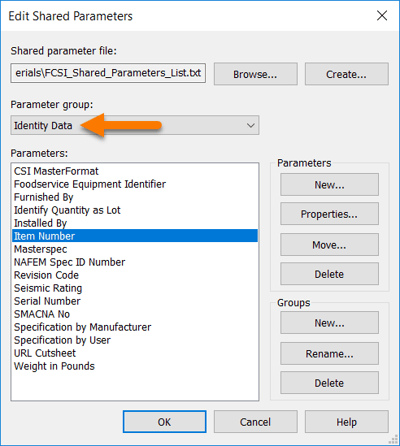
First let’s stop by the Identity Data parameter group.
Here you will see the Item Number parameter, if you remember back to the first tutorial when we created our Equipment Schedule, I mentioned the Item Number parameter, but we decided to use the Mark parameter instead.
 Next let’s look at the Electrical group.
And now you can start to see why the Industry Standard Parameters are such an amazing resource.
In general they are close to what you would expect.
Now let’s bounce over to the Connection Type group.
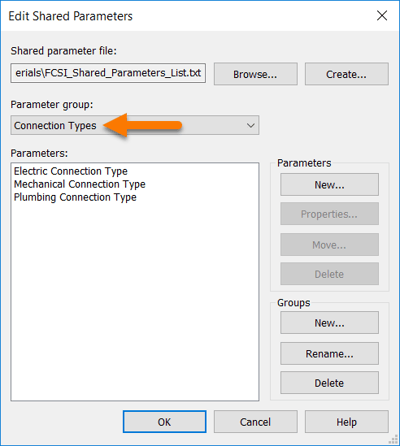 I want you to take a look at this group to understand where these parameters are hiding.
It is common to look for these parameters in the Electrical, Plumbing or Mechanical groups and get frustrated so this is just a quick intro so you know where to look.
Remarks are similar, stop by there and you will find the Electrical, Plumbing and Mechanical Remarks parameters among others.
The Remarks parameters are actually some of the most useful parameters in the bunch and for a reason you would never expect.
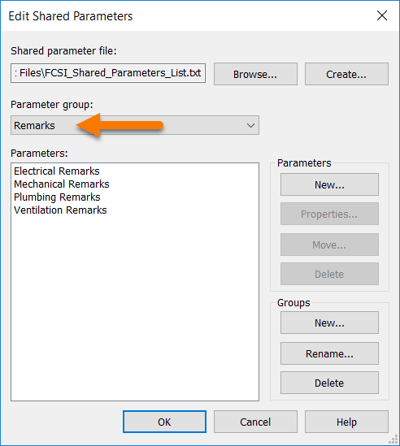 They are a great way to control what shows up in your individual MEP schedules.
On the Schedule Properties Filter tab, you could use the Electrical Remarks parameter to filter your Electrical Schedule to only show families where the Electrical Remarks parameter exists.
The Electrical Remark does not have to be filled in, it just has to exist.
So take note of where to find the Remarks parameters for when you need to add a family in the future since they can be tricky to find.
Alright let’s get back on track and finished creating that new shared parameter for our schedule.
 Click OK
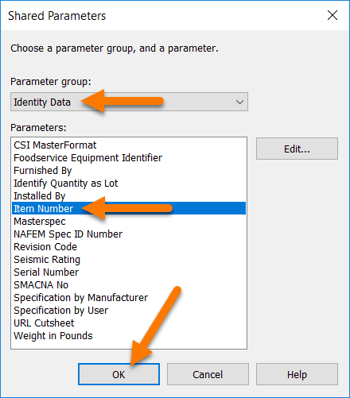
Now that we are back in the Shared Parameters window, we can select a parameter to add to our schedule.
You can only select one at a time.
Let’s add the Item Number parameter.
Go to the Identity Data parameter group and then select the Item Number parameter.
Then click OK.
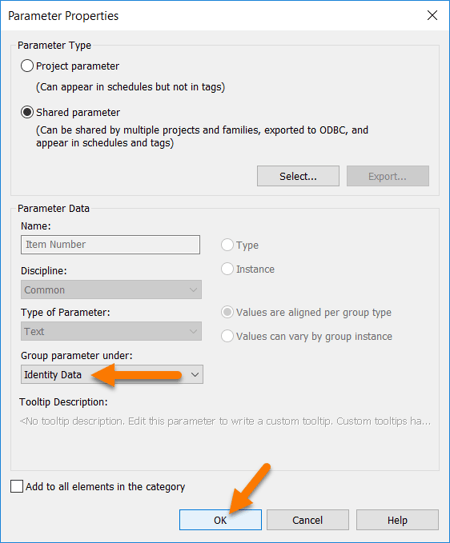
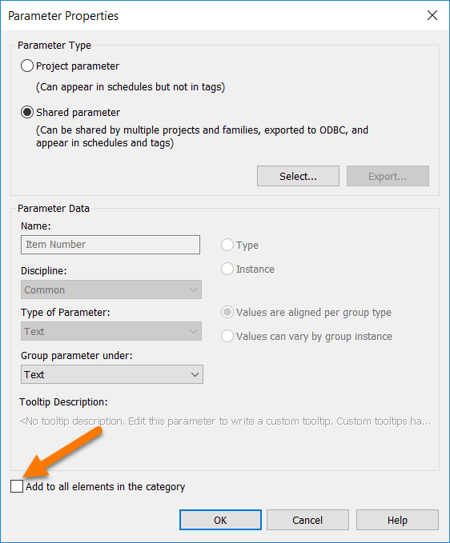 Now we are back to the Parameter Properties window and here we need to set the properties of our new Item Number parameter.
Let’s look at the “Add to all elements in the category” checkbox.
This is an important property, it will force the Item Number parameter to be visible in every Specialty Equipment family.
It doesn’t matter where that family is from, if it is Specialty Equipment then it will have an Item Number parameter for you to use.
Sounds like something we want right?
Let’s think about how we would use this parameter for a bit. Right now we are using the Mark parameter in our Equipment Schedule, but let’s assume we are going to switch out the Mark parameter for the Item Number parameter.
Ok now let’s imagine we have a completed project with 100 different Specialty Equipment families. Hoods, walk-ins, cooking equipment, work tables, shelves, sinks, shelves. It’s a completed project so it has a little bit of everything. How about faucets, overshelves or heat lamps? How about the even smaller things that you wanted to include in the project for the extra detail such as ticket rails, trim, and smallwares?
Now do you want to include every single one of those items mentioned above in your Equipment Schedule?
In Revit, schedules include every family of a given category. The Equipment Schedule is a Specialty Equipment schedule, it includes every Specialty Equipment family by default. To remove a Specialty Equipment family from the schedule you have to either change the family's category to something besides Specialty Equipment or filter it out using the Filter tab in Schedule Properties.
Changing the category isn't a good option because other categories are already in use by architects and MEP engineers so changing the category isn't a good option, how about filtering?
This is where the Item Number parameter has an advantage over the Mark parameter, you can create a filter in your Equipment Schedule to only include families where the Item Number parameter exists. Using this approach, if you don’t want to show that ticket rail in your Equipment Schedule all you need to do is delete the Item Number parameter from the ticket rail family and it disappears from the schedule. Pretty awesome right?
But wait, what if you check “Add to all elements in this category”?
If you do that then you can’t delete the Item Number parameter from any Specialty Equipment family. It doesn’t even show up in the family editor when you try to delete it but it is always there when you view a family from the project.
Then why would you ever want to use “Add to all elements in this category”?
Well let’s look at this from the opposite side. It is also possible that you get Revit families that do not have the Item Number parameter and then you will have to add that parameter, but if you have a filter on your Equipment Schedule that only shows families with Item Number then you may never see that family to remember to add the Item Number parameter.
Alright wonderful, that was a lot to learn but now I am feeling very confident that you are really learning shared parameters and schedules since they are such an important concept in Revit.
Now let’s get back to creating our Master Schedule.
 I am going to leave the “Add to all elements in the category” unchecked.
I am going to change the Group parameter to Identity Data. We discussed this many tutorials ago but this determines which group in your Properties Palette will contain this parameter.
The group is just for visual organization and doesn't affect the way the parameters work.
The Identity Data group is the correct group for the Item Number parameter but you could also put it in the Text group to have it stand out more since the Identity Data group tends to have a few other parameters in it.
I placed mine in the Identity Data group.
Click OK.
 Wonderful!
You have added a new field to your schedule using an FCSI Shared parameter also known as an Industry Standard parameter!
Let’s keep the momentum going and finish out our schedule.
I still only have that one Vulcan convection oven in my project, so we should have the same available fields.
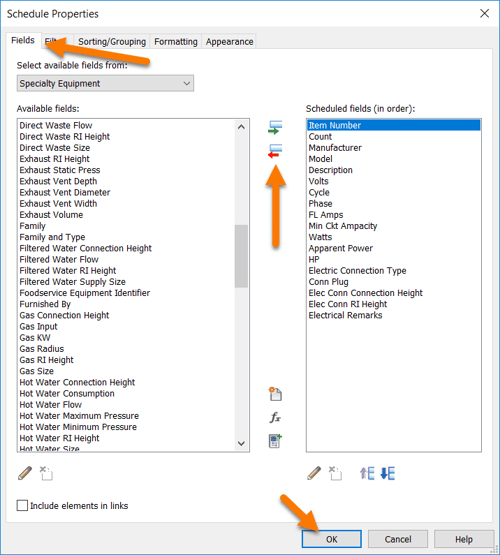
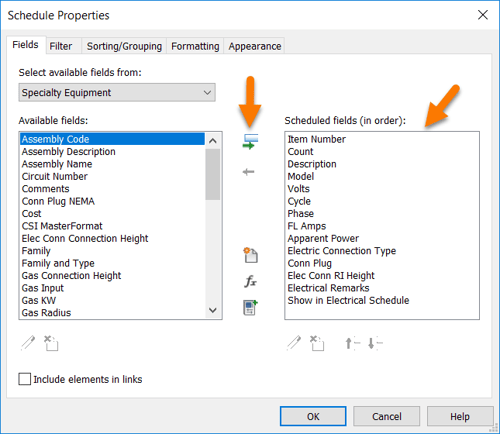 Let’s start with the Scheduled fields shown here.
Remember to highlight the field and then click the green arrow button in the middle to move the Available field to a Scheduled field.
Once you have all of the same parameters that I have, let’s create a new one that neither of us have.
Let’s create a Watts parameter.
Instead of Watts, the Vulcan convection oven has Apparent Power which is actually the more commonly used parameter when it comes to Watts vs Apparent Power.
Let’s add the Watts parameter to our schedule anyway so we can see both.
Click New parameter.
 Select Shared parameter.
Then click Select...
 The Shared Parameters window will pop up.
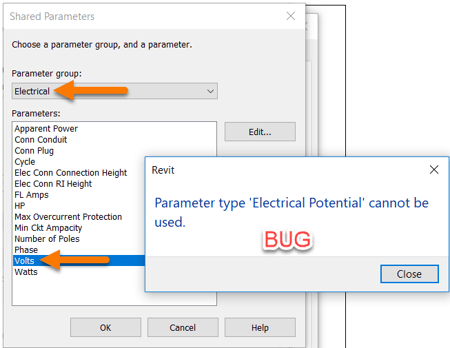
Go to the Electrical parameter group.
Then before we create the Watts parameter, I want you to try and create the Volts parameter.
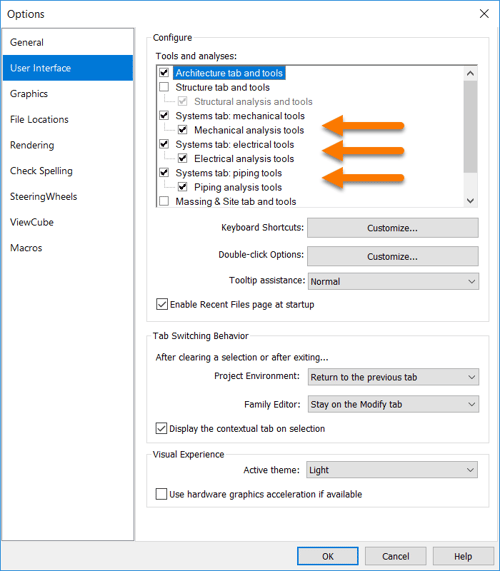 If you get this message you need to go into Options, User Interface, then turn on the MEP tools on the Systems tabs.
I had to learn this the hard way so we took this pit stop to hopefully help somebody.
If you don't have these Systems tab tools checked, you will also run into issues when trying to switch the units from Imperial to Metric on any of the MEP parameters.
So make sure you turn them on!
 Back to adding the Watts parameter.
Go to the Electrical parameter group and select the Watts parameter.
Then click OK.
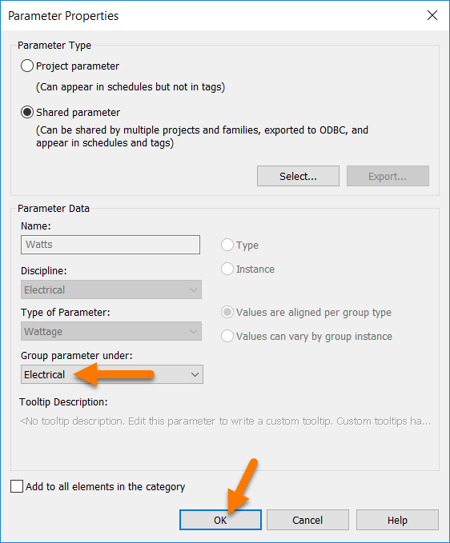
In the Parameter Properties window change the Group parameter under: to Electrical.
Then click OK.
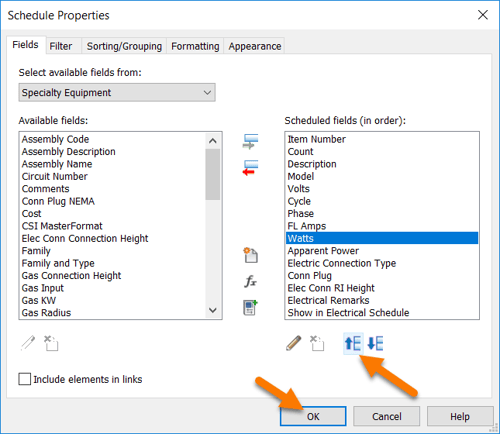 Use the Move Up button to move the Watts parameter up next to the Apparent Power parameter.
Ok so far we have added all of the Electrical parameters.
I think it is time to see what it looks like.
Click OK.


Great work!
This schedule is off to a great start but let's finish adding the remaining parameters.
It was easy to create this Electrical Schedule because we had all of the parameters we needed since they came in with the Vulcan convection oven, wouldn't it be grand if we had a family with all of the Industry Standard Parameters we need already inserted?
Well now you do.
Introducing the FoodserviceScheduleMaker.rfa
This is something I came up with while making this tutorial and it has turned out to be incredibly useful. It is just a simple family with every major Industry Standard Parameter.
Just insert this family into your project and all of the Industry Standard Parameters will be available fields when creating schedules. Once you are finished you can remove the family from your project and only the parameters that are not in use will be removed so your schedules will remain intact and be unaffected. Pretty cool right?
Let's give it a try now to help us finish our Master Schedule.
Our Master Schedule should have the following fields in this order:
Item Number
Count
Manufacturer
Model
Description
Volts
Cycle
Phase
FL Amps
Min Ckt Ampacity
Watts
Apparent Power
Electric Connection Type
Conn Plug
Elec Conn Connection Height
Elec Conn RI Height
Electrical Remarks
Cold Water Size
Cold Water Flow
Cold Water Consumption
Cold Water Connection Height
Cold Water RI Height
Hot Water Size
Hot Water Flow
Hot Water Consumption
Hot Water Temperature
Hot Water Connection Height
Hot Water RI Height
Filtered Water Supply Size
Filtered Water Connection Height
Filtered Water RI Height
Direct Waste Size
Direct Waste Flow
Direct Waste Connection Height
Direct Waste RI Height
Indirect Waste Size
Indirect Waste Flow
Indirect Waste Connection Height
Indirect Waste Connection Type
Waste Water Discharge Temperature
Plumbing Remarks
Gas Size
Gas Input
Gas Connection Height
Gas RI Height
Chilled Water Supply Size
Chilled Water Flow
Chilled Water Temperature
Chilled Water Supply Connection Height
Chilled Water Supply RI Height
Chilled Water Return Size
Chilled Water Return Connection Height
Chilled Water Return RI Height
Steam Supply Size
Steam Supply Volume
Steam Pounds per Hour
Steam Supply Minimum Pressure
Steam Supply Maximum Pressure
Steam Supply Connection Height
Steam Supply RI Height
Condensate Return Size
Condensate Return Connection Height
Condensate Return RI Height
Refrigerant Type
Refrigerant Volume
Mechanical Remarks
Exhaust Volume
Exhaust Static Press
Exhaust Vent Width
Exhaust Vent Depth
Exhaust Vent Diameter
Exhaust RI Height
MU Air Volume
MU Air Static Press
MU Air Vent Width
MU Air Vent Depth
MU Air Vent Diameter
MU Air RI Height
Ventilation Remarks
 Wow that is a whole lot of parameters.
But don't fret, all you need to do is move each one of the above parameters over to the right in your Schedule Properties.
By inserting the Foodservice Schedule Maker family before we began, we eliminated the need to create any new parameters inside the Project.
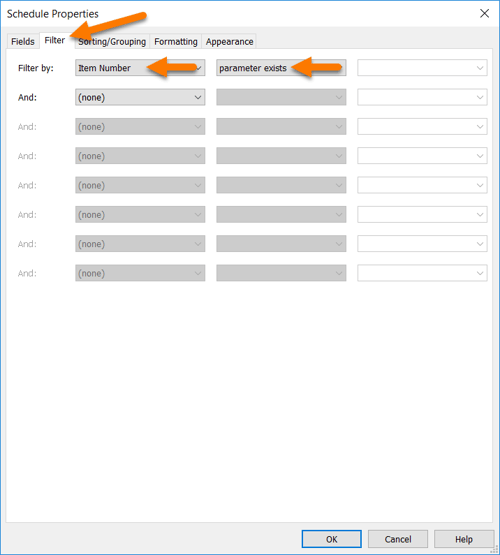 Alright now let's move over to the Filter tab.
Here we will add a Item Number filter to only show Specialty Equipment families with the Item Number parameter.
In Filter by, select the Item Number parameter and select parameter exists.
Remember this is not perfect and some industry content does not contain the Item Number parameter, or sometimes they have the wrong Item Number parameter. Tsk Tsk.
But when this happens you will notice it when tagging the equipment and you can edit the families with the wrong Item Number then.
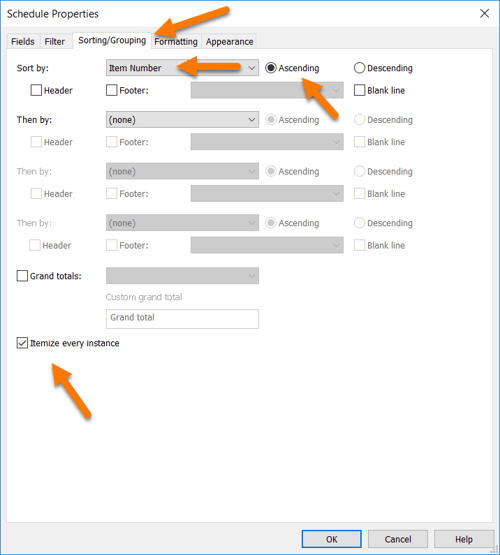 Ok now let's hop over to the Sorting/Grouping tab.
Under Sort by: Select Item Number from the dropdown to Sort by and leave Ascending selected.
This means our Schedule will be sorted by the Item Number column starting at 1.
The Itemize every instance checkbox is a quantity override that forces every family to be displayed on one line even if they are the same family.
For example if you had 3 of the same piece of equipment with the Item Number 15 and they were only shown in 1 row with a quantity of 3, then you could use the Itemize every instance checkbox to spread these 3 items out into 3 rows.
 This is a really helpful tool to seperate families especially when the families do not have Item Number and are all collapsing into one.
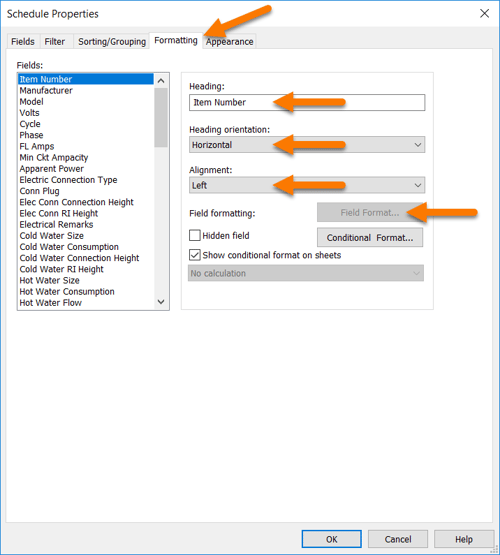
Next up the Formatting tab.
This is where the real schedule making is done.
Hidden field is the same as Hiding a Column in the Schedule View; it is used to hide entire columns such as the Show in Electrical Schedule column so they do not show up on your sheets.
Conditional Formats are used to change the color of the cells in a schedule when those cells meet certain conditions, such as turn everything red when the value in the cell is greater than 100. We won't be using these.
The things we will be changing are:
- Headings
- Alignment
- Field Format
Headings - These are the column headers or titles of each column. This is the actual text that will be shown at the top of your schedule so be mindful of how long your titles are since they will translate into your schedule being wider than the sheet it is being placed on.
Heading Orientation - This is can be changed from Horizontal to Vertical to rotate the Heading text by 90 degrees. This can be used to save space but it can be difficult to read. We are not going to use this.
Alignment - This is the text alignment for the entire column. I like to keep the text left aligned in most cases and the MEP parameters as center aligned.
Field Format - This is where we control the units and unit symbols for each field. All Revit projects are setup with a default set of units and unit symbols called referred to as Project Settings. Once you deselect Use Project Settings, you can specify the units of measure and unit symbols. We will use this often to change the units since we started with the standard Revit Architectural Template and have never updated any of the Project Units.
Alright well let's get to it.
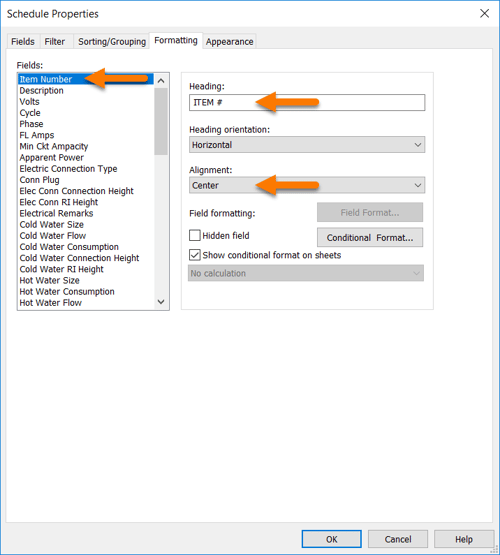 First up, the Item Number parameter/field.
I changed the Heading to ITEM # to save space on the sheet for other columns.
I changed the Alignment to Center to make the numbers easier to read.
Next up I have Manufacturer and Model but I am actually going to remove these and replace them with the Description parameter.

This time the only thing i am changing is the Heading to capitalize it, DESCRIPTION.
Next up the Volts field.
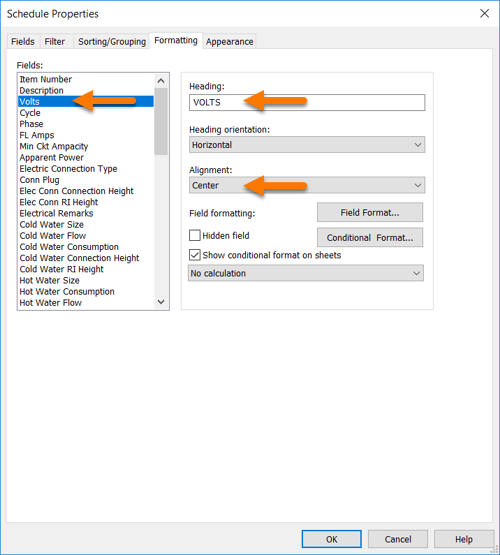
Once again I am going to capitalize the Heading to VOLTS.
And change the alignment to Center.
This time the Field Format button is active, that is because Volts has an associated Unit of Measure, Item Number and Description do not.
Let's take a look at how Field Format works in the Apparent Power field since that is a field where we need to edit Field Format.
We are going to jump ahead to the Apparent Power parameter but there will be a table of every field's Schedule Properties in just a bit.
Ok first let me explain why we are we using Apparent Power instead of Watts.
Apparent Power is a complex electrical engineering concept so to avoid getting technical all you need to know is that Apparent Power is another form of Power just like Watts.
It is actually a better indicator of Power than Watts. Take a light bulb for example, it could be rated at 100 Watts, but its Apparent Power could be higher than 100 Watts. So Apparent Power is more accurate.
Apparent Power is also a more widely used parameter in the Industry Standard Parameters so you should use it as opposed to Watts, or show both and consolidate their values into the same field.
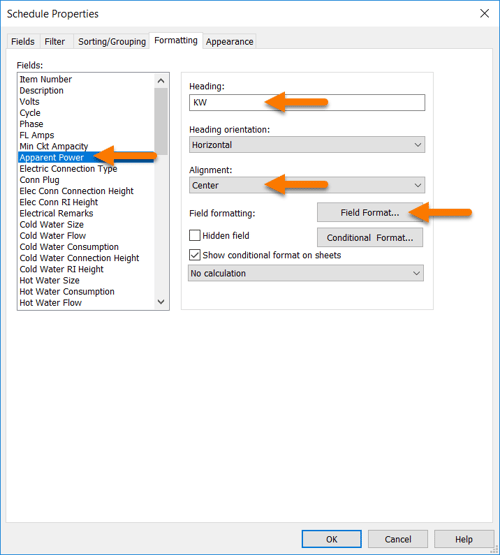 Ok so let's start by changing the Heading to KW.
It is helpful to use KW in this instance because it is the unit of measure for both Watts and Apparent Power.
Like all of the MEP parameters I change the Alignment to Center.
Alright let's now click the Field Format button to change the units to KW also.
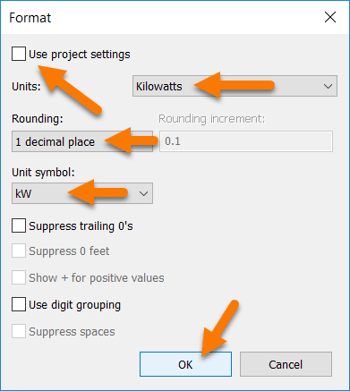 First we need to uncheck Use project settings to begin.
Next we can change the Units to Kilowatts (KW)
I like to only have 1 decimal place in this field but you could also have 2.
Revit is great about making sure the Unit symbol matches the Unit but verify it anyway.
Here we want our Unit symbol to be kW.
That's it, let's click OK to return.
Great work!
You just learned how to format scheduled fields, the main task in schedule making.
Here are the Schedule Properties for the rest of the Industry Standard Parameters:
| Parameter | Heading | Alignment | Units | Unit Symbol |
|---|---|---|---|---|
| Item Number | ITEM # | Center | ||
| Volts | VOLTS | Center | Volts | V |
| Cycle | CYCLE | Center | Hertz | Hz |
| Phase | PH | Center | ||
| FL Amps | AMPS | Center | Amperes | A |
| Min Ckt Ampacity | MCA | Center | Amperes | A |
| Watts | KW | Center | Kilowatts | kW |
| Apparent Power | KW | Center | Kilowatts | kW |
| HP | HP | Center | ||
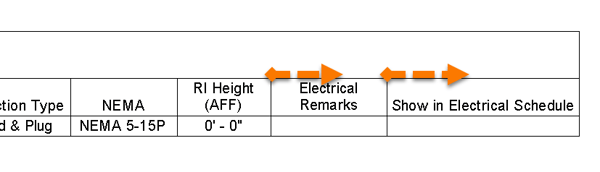
| Electric Connection Type | CONN TYPE | Center | ||
| Conn Plug | NEMA | Center | ||
| Elec Conn Connection Height | CONN HT | Center | Fractional Inches | Round to 1" |
| Elec Conn RI Height | RI HEIGHT(AFF) | Center | Fractional Inches | Round to 1" |
| Electrical Remarks | REMARKS | Left | ||
| Cold Water Size | CW SIZE | Center | Fractional Inches | Round to 1/8" |
| Cold Water Flow | CW FLOW | Center | Gallons Per Minute | GPM |
| Cold Water Consumption | CW USAGE | Center | ||
| Cold Water Connection Height | CW CONN HT | Center | Fractional Inches | Round to 1" |
| Cold Water RI Height | CW RI HEIGHT(AFF) | Center | Fractional Inches | Round to 1" |
| Hot Water Size | HW SIZE | Center | Fractional Inches | Round to 1/8" |
| Hot Water Flow | HW FLOW | Center | Gallons Per Minute | GPM |
| Hot Water Consumption | HW USAGE | Center | ||
| Hot Water Temperature | HW TEMP | Center | Fahrenheit | °F |
| Hot Water Connection Height | HW CONN HT | Center | Fractional Inches | Round to 1" |
| Hot Water RI Height | HW RI HEIGHT(AFF) | Center | Fractional Inches | Round to 1" |
| Filtered Water Supply Size | FW SIZE | Center | Fractional Inches | Round to 1/8" |
| Filtered Water Connection Height | FW CONN HT | Center | Fractional Inches | Round to 1" |
| Filtered Water RI Height | FW RI HEIGHT(AFF) | Center | Fractional Inches | Round to 1" |
| Direct Waste Size | DW SIZE | Center | Fractional Inches | Round to 1/8" |
| Direct Waste Flow | DW FLOW | Center | Gallons Per Minute | GPM |
| Direct Waste Connection Height | DW CONN HT | Center | Fractional Inches | Round to 1" |
| Direct Waste RI Height | DW RI HEIGHT(AFF) | Center | Fractional Inches | Round to 1" |
| Indirect Waste Size | IW SIZE | Center | Fractional Inches | Round to 1/8" |
| Indirect Waste Flow | IW FLOW | Center | Gallons Per Minute | GPM |
| Indirect Waste Connection Height | IW CONN HT | Center | Fractional Inches | Round to 1" |
| Indirect Waste Connection Type | IW CONN TYPE | Center | ||
| Waste Water Discharge Temperature | DISCHARGE TEMP | Center | Fahrenheit | °F |
| Plumbing Remarks | REMARKS | Left | ||
| Gas Size | GAS SIZE | Center | Fractional Inches | Round to 1/8" |
| Gas Input | GAS BTU | Center | BTU per Hour | Btu/h - Round to 0 decimal places and use digit grouping |
| Gas Connection Height | GAS CONN HT | Center | Fractional Inches | Round to 1" |
| Gas RI Height | GAS RI HEIGHT(AFF) | Center | Fractional Inches | Round to 1" |
| Chilled Water Supply Size | CHILLED WATER SUPPLY SIZE | Center | Fractional Inches | Round to 1/8" |
| Chilled Water Flow | CHILLED WATER FLOW | Center | Gallons Per Minute | GPM |
| Chilled Water Temperature | CHILLED WATER TEMP | Center | Fahrenheit | °F |
| Chilled Water Supply Connection Height | CHILLED WATER SUPPLY CONN HT | Center | Fractional Inches | Round to 1" |
| Chilled Water Supply RI Height | CHILLED WATER SUPPLY RI HEIGHT(AFF) | Center | Fractional Inches | Round to 1" |
| Chilled Water Return Size | CHILLED WATER RETURN SIZE | Center | Fractional Inches | Round to 1/8" |
| Chilled Water Return Connection Height | CHILLED WATER RETURN CONN HT | Center | Fractional Inches | Round to 1" |
| Chilled Water Return RI Height | CHILLED WATER RETURN RI HEIGHT(AFF) | Center | Fractional Inches | Round to 1" |
| Steam Supply Size | STEAM SIZE | Center | Fractional Inches | Round to 1/8" |
| Steam Supply Volume | STEAM VOLUME | Center | Gallons Per Minute | GPM |
| Steam Supply Minimum Pressure | STEAM MIN PRESS | Center | Pounds per Square Inch | psi |
| Steam Supply Maximum Pressure | STEAM MAX PRESS | Center | Pounds per Square Inch | psi |
| Steam Supply Connection Height | STEAM CONN HT | Center | Fractional Inches | Round to 1" |
| Steam Supply RI Height | STEAM RI HEIGHT(AFF) | Center | Fractional Inches | Round to 1" |
| Condensate Return Size | CONDENSATE SIZE | Center | Fractional Inches | Round to 1/8" |
| Condensate Return Connection Height | CONDENSATE CONN HT | Center | Fractional Inches | Round to 1" |
| Condensate Return RI Height | CONDENSATE RI HEIGHT(AFF) | Center | Fractional Inches | Round to 1" |
| Refrigerant Volume | REFRIGERANT VOLUME | Center | Pounds | lb |
| Refrigerant Type | REFRIGERANT TYPE | Center | ||
| Mechanical Remarks | REMARKS | Left | ||
| Exhaust Volume | EXHAUST VOLUME | Center | Cubic Feet per Minute | CFM |
| Exhaust Static Press | EXHAUST SP | Center | ||
| Exhaust Vent Width | EXHAUST WIDTH | Center | Fractional Inches | Round to 1/16" |
| Exhaust Vent Depth | EXHAUST DEPTH | Center | Fractional Inches | Round to 1/16" |
| Exhaust Vent Diameter | EXHAUST DIAMETER | Center | Fractional Inches | Round to 1/16" |
| Exhaust RI Height | EXHAUST RI HEIGHT | Center | Fractional Inches | Round to 1/16" |
| MU Air Volume | MU AIR VOLUME | Center | Cubic Feet per Minute | CFM |
| MU Air Static Press | MU AIR SP | Center | ||
| MU Air Vent Width | MU AIR WIDTH | Center | Fractional Inches | Round to 1/16" |
| MU Air Vent Depth | MU AIR DEPTH | Center | Fractional Inches | Round to 1/16" |
| MU Air Vent Diameter | MU AIR DIAMETER | Center | Fractional Inches | Round to 1/16" |
| MU Air RI Height | MU AIR RI HEIGHT | Center | Fractional Inches | Round to 1/16" |
| Ventilation Remarks | REMARKS | Left |
What a wonderful resource this will be.
Go ahead and make your perfect Master Schedule now and remember that this schedule will not be placed on a sheet, it will be used to create other schedules that go on sheets. If you want to place a Full MEP Schedule on a sheet then you can easily create one when we create the individual schedules.
So it would be wise to include every parameter that you think you will need.
To create schedules from our Master Schedule, we will Duplicate the Master Schedule then remove all of the fields we don't need and rename it. So easy.
This means our Master Schedule is the template for every other schedule so we better make sure it looks good on a sheet.
Let's take a look at it before we place it on a sheet.

 There is only one issue that jumps out to me, the blank row in between the headers and the body.
Let's get rid of that blank row.
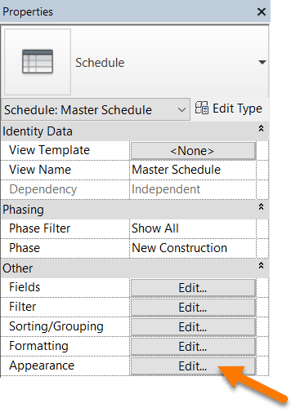
Click the Edit... button next to Appearance to open the Schedule Properties.
These (5) buttons are just shortcuts to the (5) Schedule Properties tabs.
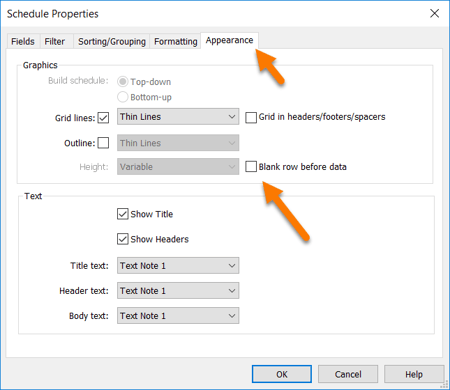 Uncheck the Blank row before data checkbox.
Other things you can do on the Appearance tab are:
- Turn the Grid lines on/off
- Show/Hide Title
- Show/Hide Headers
- Change the Text Font
We have now completed our Master Schedule!
Wonderful job!
 Before we move on to creating our individual schedules, I have a couple more schedule tips to share.
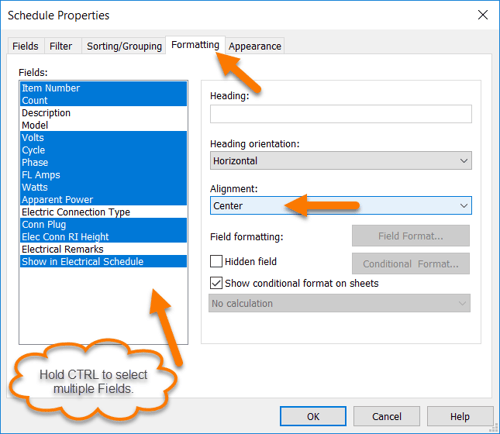
First tip, you can select multiple Fields at the same time by holding CTRL and once they are selected you can change their alignment all at once.
The image to the right shows what it will look like when you select multiple Fields.
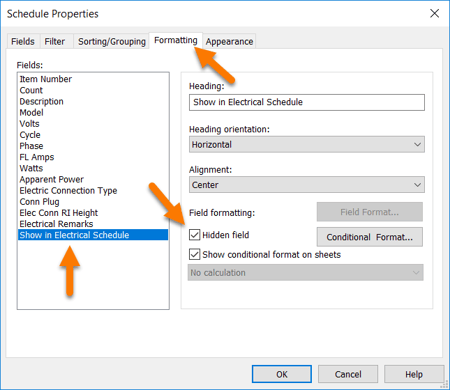 Next tip, if you completed tutorial 9 and created The Scheduler then you can also change Show in Electrical Schedule to a Hidden Field.
The will hide the Show in Electrical Schedule column in the schedule, on sheets, and when printed to PDF.
It is nice to see this column when you are working on your schedules so I will keep it visible.
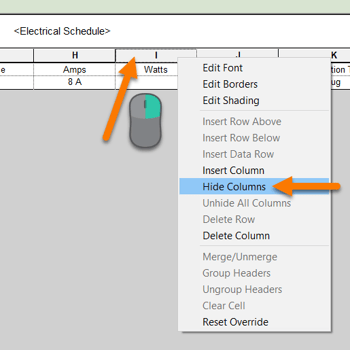 There is also a shortcut to hiding and unhiding a column, you can also right-click a column and select Hide Column.
You can even Unhide All Columns.
These shortcuts are connected to the Hidden Field checkbox in the Schedule Properties, so when you click Hide Column, the checkbox in Schedule Properties will also show Hidden Field.
 Alright let's get back to the task at hand, creating schedules.
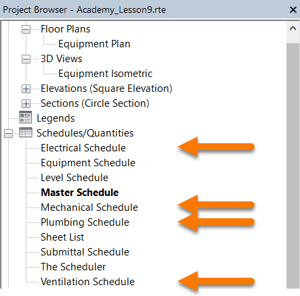
We are going to create the following schedules:
- Electrical Schedule
- Plumbing Schedule
- Mechanical Schedule
- Ventilation Schedule
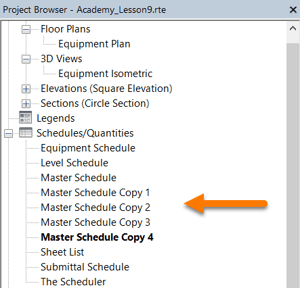
To get started, let's Duplicate our Master Schedule (4) times.
Next we need to rename each one.
There we go.
Also everything is getting difficult to find in here but we will clean this up in the next tutorial.
Okay so now all we need to do is remove all of the fields that we do not need from each schedule.
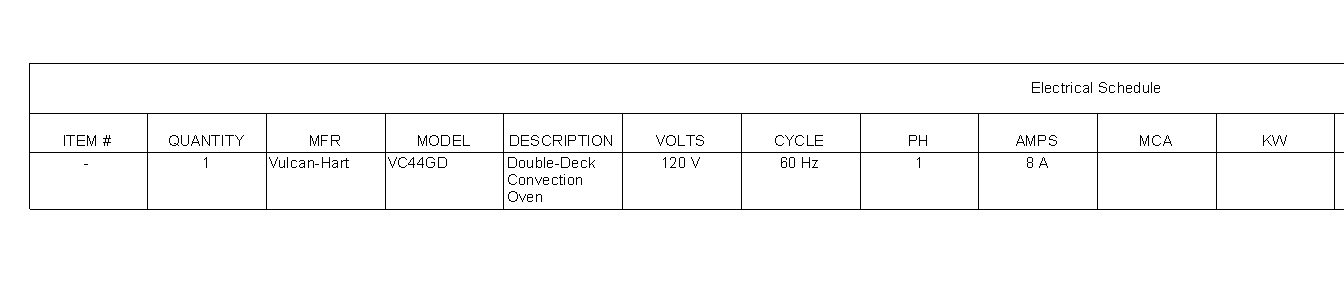
 Let's start with the Electrical Schedule.
Click Fields... to return to the Schedule Properties.
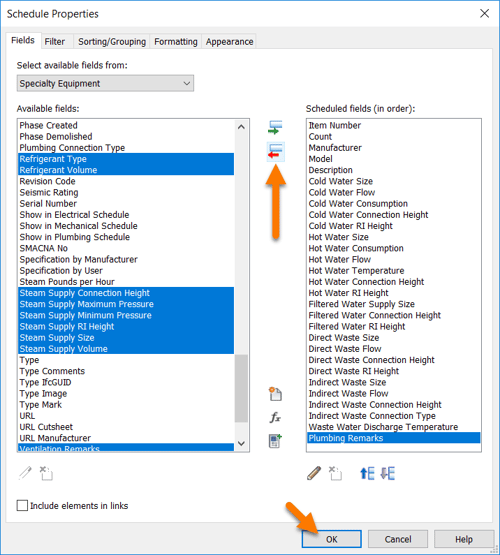
All we need to do here is remove all of the Scheduled fields after Electrical Remarks using the red arrow.
Once your Scheduled fields look like the image to the right you are done.
That's it.
Next up, the Plumbing Schedule.
This time I have tip for you, you can use the CTRL and SHIFT keys to select more than one Scheduled field and then use the red arrow to move them all at once.
I was able to move every field that we didn't need with just 2 clicks of the red arrow.
Next up, the Mechanical Schedule
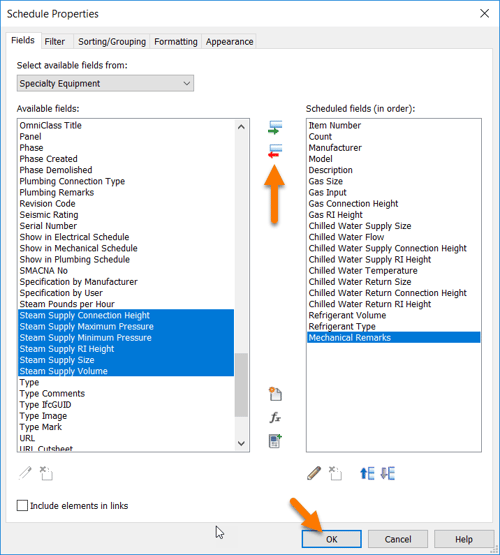 This time I am going to remove some of the mechanical fields as well.
I am going to remove the Steam fields since I do not want to include those on this mechanical schedule at this time.
Alright just one schedule left, the Ventilation Schedule.
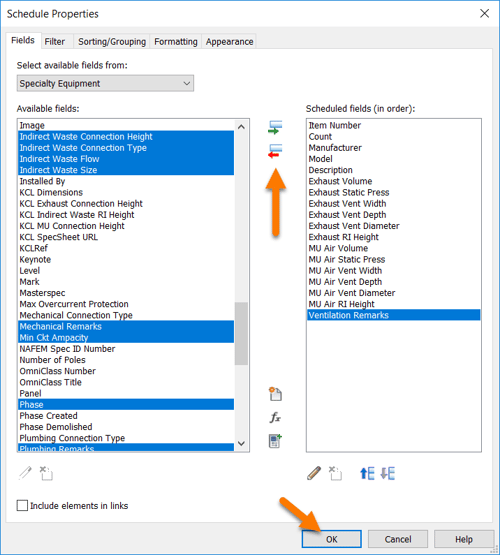
Also you have probably noticed i have included the Count, Manufacturer, Model, and Description fields in each of these schedules.
Feel free to remove any of those fields, I just wanted to include all possible options so everybody is aware.
Alright well that's all folks, let's click OK and place move on to placing these schedules onto a sheet.
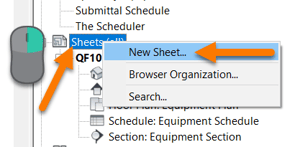 First we need a home for our schedules, right-click Sheets and select New Sheet.
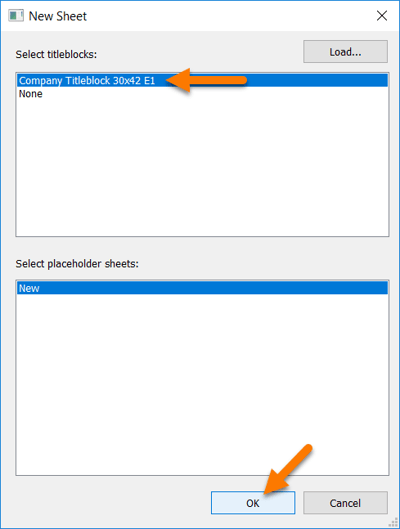
Select the Titleblock family we created in Tutorial 7.
Then click OK.
Now just click and drag your Electrical Schedule over onto the white space of your sheet.
Repeat for your other schedules.
 You will end up with something like this for each schedule.
But this is easy to fix, once you place a schedule on a sheet and you select it, grips appear allowing you to stretch the columns wider.
If you don't want your headings to take up 2 lines, drag the edge of the columns to widen it.
Once you stretch the columns out, everything falls into place quite nicely.
Do this for all of your schedules and you will end up with a nice looking single line per item schedule like the ones below.


Well that's it, you did it, you created a Master Schedule, an Electrical Schedule, a Plumbing Schedule, a Mechanical Schedule and a Ventilation Schedule!
I am very impressed, a lot of hard work went into this but it was well worth it. Wonderful job!
Thank you for attending the Kitchautomation Academy!
Next up- Create View Templates
Cheers!