

Click Here to Download the Tutorial 8 Revit Template to use with this tutorial 👈⏩💾.
Tutorial 8 – Create a Revision Cloud Tag
Welcome back. Last tutorial was quite the achievement, this tutorial will be much easier. We're going to build on what we learned about Revisions and Revision Clouds when we created the Title Block. You are probably wondering what a Revision Cloud Tag even is and why it is necessary so let’s start there.
 The Revision Cloud Tag is just what is sounds like, a tag for Revision Clouds. It’s that little triangle with a number inside that we are all used to seeing next to a revision cloud or in the title block on the revision schedule.
 Let’s create a Revision Cloud Tag family now.
First go to the Revit main menu, then hover over New, then click Annotation Symbol.
Navigate to the Generic Tag and click Open.

 Once we have the Generic Tag family template opened, let's change the Category from Generic Tag to Revision Cloud Tag.
On the Create ribbon, click on the Family Category and Parameters button.

Scroll down to select Revision Cloud Tags then click OK.
 Ok now before we start drawing, let’s take a look at this note that was left for us.
We already changed the Category so we can ignore that.
The insertion point is important to us, it will determine where the tag leader touches the tag. The leader is the line that will connect the tag to the Revision Cloud.
 We just need to make sure we draw the tag is so that it touches the insertion point, that way we don’t end up with something that looks like this.
Make sure you delete that red text note and let’s draw our tag.
 To start drawing, press LI on your keyboard for the Line command, you may want to zoom in first though.
We are going to draw a 1/4" equilateral triangle, meaning all sides are equal and have equal angles at 60 degrees each. I had to do a little research so figured I would share ha.
Also, you will see that I centered my triangle over the insertion point.
If you want the leader to attach to the corner of your tag, you can move the corner to the intersection.
 Ok now we need to add a Label to the center of our tag to show the Revision Number.
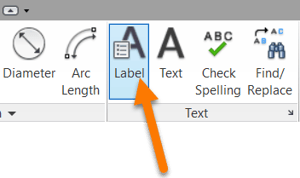
On the Create ribbon, click on the Label button.
Then click on the drawing area to open the Edit Label window. This should be very familiar by now.
 Select the Revision Number parameter, then I like to change the sample value to 0 since it seems a little easier to center it in the middle of the triangle. Click OK once you set the Sample Value.
 Remember to shrink the text box around your label to as small as possible and they nudge the Label into the center of your triangle.
Once it looks centered, click the Load into Project and Close button.

Alright now that we have loaded our Revision Cloud Tag into our Template, lets see how it looks.
 On the Annotate ribbon, click the Tag By Category button.
 Then click on your Revision Cloud.
Looking good.
Also, if you click on the Tag, over in the Properties you can turn the leader line off to give a more traditional look.


So, I mentioned earlier that we had to create a Revision Cloud for our Revision to show up in our Revision Schedule. Now let’s take a deeper dive into Revisions since they are one of the more confusing areas in Revit, although it’s hard to blame Revit when the concept of revisions and how to use them still seems to depend on which architect you ask. To refresh your memory, here is what the Sheet Issues/Revision window looks like in Revit.
 There are two ways to open the it, one way is the button on the View ribbon.
The other way is on the Manage tab, under Additional Settings dropdown.

The Numbering setting is used if you want to have different sheets numbered based on that sheet only. This could be useful if you have multiple parts or phases of a project going on at the same time. But most of the time you will just be using the Per Project numbering.
The Numbering options are helpful if you need to start at a specific value since there is no other way to change the Revision Number.
The Arc length is referring to the shape of the Revision Clouds associated with each Revision. If you want your revisions to look different, this is the place to do that.
In general, you won’t need to touch any of the settings in this area.
You will need to change the Date and the Description by clicking on the spreadsheet cell.
The Issued checkbox locks the Revision so you cannot change the Date or Description, you cannot create new Revision Clouds associated with that Revision, and you cannot delete the existing Revision Clouds. So if you ever wonder why you can’t delete a Revision Cloud, you need to uncheck the Issued checkbox first.
 What if you want to remove the Revision Clouds but you still want to show the Revision info in the title block? Well that is what this last column is for, the Show column. Revit allows you to show either the Cloud and Tag, the Tag only, or None.
Select None and the Clouds disappear but the title block stays the same.

 Turn Cloud and Tag back on and let me show you the different ways you can use Revision Clouds.
In the last tutorial I had you draw a Revision Cloud on the sheet so we could trigger the revision to show up in the title block.
But that is just one place you can draw Revision Clouds, you can also draw them in a view and if that view is placed on a sheet, it will also trigger the revision to show up in the title block.
Another way you can use the Revision Clouds is to cover part of a Schedule on a Sheet like this:
This works well when you have large chunks of changes, but it doesn’t look so great for 1 or 2 changes. 
 You can make it look better by changing the Arc Radius to 1/8” but I think this next method will be your favorite.
Go ahead an delete the Revision Cloud around the Equipment Schedule and then draw a new Revision Cloud on the Sheet, just make sure it is not inside of a view. I am going to draw mine around the view closest to the Equipment Schedule, like this:

Now I want you to Tag the Revision Cloud we just created using the Tag by Category button on the Annotate ribbon. 
The keyboard shortcut for the Tag by Category button is TG, just like TAG without an A.
Next time you find yourself using the same button over and over again, check out it’s keyboard shortcut by hovering the mouse over the button for a few seconds.
After you add the Revision Cloud Tag, please select it to make it is active.

Then in the Properties window, uncheck the Leader Line. This is the same as unchecking the Leader checkbox in the green action bar.
By unchecked the Leader Line, the Tag can now be moved anywhere on the sheet. We are going to move it just to the left of our Item Number 1 in the Equipment Schedule like so.
What if you need another tag for a different Item?
 Just repeat the same process, you can have an unlimited number of tags for each Revision Cloud, they even snap to each other.
Now there are a couple things about this last method to keep in mind.
First, you must tag a Revision Cloud that is on the same sheet as your Equipment Schedule.
Second, after you have created the tags without leaders, if you move the Revision Cloud, the tags will move with it.
This is also true for Specialty Equipment tags, if the host family is moved, the tags move with it, even when they aren’t connected by leaders.
 If you are worried about something being moved accidentally, then you should Pin it.
The Pin button is a great tool that simply locks an element in place.
I t is perfect for locking architectural backgrounds so you don’t accidently select them when trying to select other elements.
To Unpin an element, select the element that is Pinned and click the Unpin button.
 Now if somebody tries to move the pinned Revision Cloud they will get this error message.
Alright I have one more tip to show you that brings the whole thing together.
This is what our Revision Schedule looks like currently but I want it to match our Revision Cloud Tag.
 Let’s begin by double-clicking our Title Block family to open the Family Editor.
Then just like earlier, use the Line tool (LI) to draw a 1/4" equilateral triangle.
Finally move your triangle to the left side of your Revision Schedule where the number column would be. You can use your mouse to hover over the Revision Schedule to help you place the triangle perfectly.
Once you are finished it should look something like this.
Next we are going to add a Visibility parameter to our triangle so we can turn it on and off with a checkbox. Sounds difficult but it’s actually quite easy and very useful when creating families.
To begin select all 3 lines of your triangle since we want to control all 3 lines together.
Then in the Properties window, click on the tiny rectangular gray button on the far right called Associate Family Parameter.
 This opens the Associate Family Parameter window.
As you can see, we don’t have any existing family parameters of compatible type, but that’s not unusual and nothing we can’t fix.
We can even create a new parameter from this window using the New Parameter button.
Let’s do that now, click on the New Parameter button.
 This will open the Family Parameter Properties window that will look familiar from when we created the parameters for the Title Block. This is a shortcut to create a new parameter, that is also why Revit has already done some of the work by pre-filling the Discipline and the Type of Parameter dropdowns since that Yes/No parameter type is required to control visibility.
When naming visibility parameters it is important to phrase the name to coincide with the action. Therefore, most names start with “Show” which works really well.
I am going to name my parameter “Show ▲ - Revision 1”. You can also create the ▲ in Revit by holding ALT and pressing 3 0
The parameter group is just a way to keep the parameters organized, it doesn’t affect how they work. I like to keep all my visibility parameters in the Visibility group.
The last thing we need to do is choose between a Type or an Instance parameter. The best way to think about this is to think about how the parameter should work when there are 2 of the same family. These are title block families so if we have 2 of the same title block family and we turn on the parameter to Show ▲, do we also want the other title block family to follow along and Show ▲? Well the answer is no, our 2 title block families would presumably be from 2 different sheets in our project and it is very possible that one of those sheets has a revision while the other does not. Our parameter needs to be independent from family to family since each title block is unique. These are all traits of an instance family.
Once you have named your parameter, selected the group and changed to an Instance parameter, click OK. Then click OK again to return to the Title Block.
 Keep the triangle lines selected and look at the Properties window. The Visible checkbox option is now grayed out and not usable, also that tiny gray button now has an “=” sign inside of it. Let’s load this new updated Title Block into our template and see how it looks.

Looks great!
 Keep the Title Block selected and pop over to the Properties window to find your shiny new visibility parameter. Now I imagine the parameter groups will make much more sense as you can now see the others such as Graphics, Identity Data and Other.
Let’s see what happens when we un-check the visibility parameter.

Pretty cool!
Alright well that does it for the Title Block (hallelujah), we can now move on to the rest of our template. Onward!
Thank you for attending the Kitchautomation Academy!
Next up- Create Supporting Schedules
Cheers!